Even with meticulous attention to detail, quality hardware, and proper tooling, precision rifle builders and competitive shooters will inevitably face stripped or sheared fasteners. These common issues can halt a project or rifle maintenance, but established gunsmithing techniques offer reliable solutions. It is crucial to underscore that any work involving firearm modification or repair should be undertaken by a competent, licensed gunsmith. Performing such tasks without proper expertise can void warranties, lead to an unsafe firearm, and risk personal injury or death.
When confronted with a stripped screw head—where the driver recess is compromised, preventing conventional removal—several approaches are employed. The initial documented technique often involves attempting to seat a slightly larger driver bit, such as a Torx or Allen, into the damaged head, tapping it gently to gain purchase. While occasionally successful, this method can sometimes exacerbate the damage, further stripping the head and requiring an alternative strategy.
A more robust method, frequently utilized when the initial attempt fails, involves carefully drilling out the screw head. Technicians typically select a drill bit with a diameter slightly larger than the screw's shank, allowing it to cut through the head without damaging the threads below. This operation is commonly performed with the rifle action securely held in a vise, using a cordless drill to maintain control. When executed correctly, the screw head detaches from the shank. The remaining threaded shank, no longer under tension from the head, can then be readily removed from the action using a set of locking pliers. This process has been described as consistently effective for years by those employing it.
The challenge escalates when dealing with a sheared screw, especially one that has broken off flush with the rifle action. In these instances, the absence of material above the surface prevents the use of locking pliers or even attempts to cut a slot for a flathead screwdriver, which is only an option if sufficient material protrudes. The primary recourse for a flush-sheared screw is precise drilling.
While some experienced individuals have managed to drill out sheared screws with a handheld drill, this is widely considered less than ideal due to the high risk of misalignment and further damage. The best practice, as advised by professionals, dictates the use of a milling machine or a high-quality drill press to ensure absolute precision. The rifle action, such as a Remington 700 Police, is typically secured in a V-block, which is then clamped firmly in the milling machine's vise.
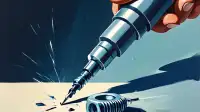
The drilling process begins with a spotting drill to establish a perfectly centered pilot hole within the remnants of the screw. Following this, an undersized drill bit is used to carefully bore through the screw. Patience and a slow approach are paramount, often involving progressively larger drill bits. If the drilling remains perfectly centered, the majority of the screw material will be removed, leaving the threads intact. Should the drilling veer slightly off-center, one side of the screw may be cut away, allowing the remaining material to be collapsed inward and extracted with a small punch. In some cases, once the bulk of the screw is removed, a tap may be necessary to recut or clear any remaining thread fragments from the action's hole.
Encountering damaged fasteners is an unavoidable aspect of long-term precision rifle maintenance and customization. While these situations can be frustrating, the established techniques for removing stripped and sheared screws provide clear paths to resolution. For any rifle owner without the specialized tools or extensive experience, consulting a competent gunsmith remains the safest and most reliable course of action to ensure the firearm's integrity and safety.